As a freelance website designer or a digital/creative agency owner, you and your team are experts in designing finely crafted websites for your clients that bring real results for them.
Now when it comes to the conversion of those designs (that are in Adobe XD, Sketch, Figma or other design formats) to WordPress website code, you usually have two options:
- Either hire an in-house development team that’ll help you with coding these websites (which is costly and hard to manage),
- Or outsource it to some external development agency to free-up your time, cut costs and save yourself from all the HR and management headaches.
If you’re sold on the idea of outsourcing, I will help you make your next outsourced design conversion project super successful with the tips given in this article.
These tips come from my experience running a WordPress agency that specializes in design to WordPress conversion projects and from the projects we do for our clients every single day.
Let’s start with a contradictory tip:
1. Do Not Outsource If You Can DIY (Do-It-Yourself)
Let’s start with the first rule: Never outsource a project that you can build yourself.
With the availability of website building tools like WordPress and its page builders, building websites with no coding knowledge is easier than ever before.
If your next project is a simple business/marketing website with a bunch of simple pages, don’t waste your money on hiring a web developer.
Instead, teach yourself one of the popular themes and page builders and use that combination to build your next website.
Now there’s a little learning curve here if you have never actually built a site yourself, but it’s definitely going to help you in the long run.
You can get started with the following tools that we use internally for our client websites:
- Astra Theme – this is a flexible and multipurpose base theme that you can use to build pretty much any kind of website.
- Astra Pro Plugin – this is an extension plugin for the free Astra theme and makes the theme even more flexible.
- Beaver Builder Plugin – this is the page builder of our choice, mainly because it’s super easy for the clients to use, highly flexible and extensible code-wise. It easy to learn and you’ll be able to start using it in no time.
- Ultimate Addons for Beaver Builder Plugin – this one is an extension to the Beaver Builder plugin that adds 40 extra modules to it. Beaver Builder and this addon plugin combined have a sufficient number of modules that you use to make pretty much anything.
- Gravity Forms Plugin – this is the last form builder plugin you’ll ever need for making any kind of forms.
Most the these are paid, but the combined cost of these will be lesser than what you’d spend on hiring a web developer.
Actionable Tip: If you have an upcoming website project that’s simple and the client is not very demanding, I suggest you try to build the site on your own using Astra and Beaver Builder. Checkout our design to WordPress conversion tutorial and spend a few hours learning these tools to implement on your project. If you can pull it off well, you’ll be able to save thousands of dollars by not needing to outsource development.
2. Don’t DIY If You Can Outsource
So this one is completely opposite of what I just discussed above. Never ever try to build a site yourself unless you’re 100% sure what you’re doing.
Let me explain this with a story.
I had a client recently who came with his educational site for kids. He wanted us to add a little functionality to his website. The site had multiple pages on Maths, Science, English, Learn to Color, Games and so on and there were around 50+ such pages.
Every page had identical structure and each one had a grid of 6 to 9 educational videos that opened up in a popup.
The site looked great from outside until I saw what was on the backend.
I was amazed to see that he had manually created each and every page on the site using a page builder and created around 200 individual popups manually using a popup maker plugin.
That’s like having an eCommerce site with 1,000 products and creating 1,000 individual pages manually for every single product statically.
If you know how to code even a little bit, you’ll understand what this means.
He made everything so static that to make a little change globally to the pages or the popups he’ll have to go and edit each and every one of them manually.
Imagine if the site grows to have 500 or maybe 1,000 such videos. It will be a nightmare to manage the site.
If we (or any other experienced developer for that matter) would have made their site from scratch, we would have made a single template file for the pages and a single template for the popup and kept all the data in the database that can be then fetched and rendered via the templates.
What’s interesting is, this was not the end of his issue. He asked me if I knew a mobile app developer who can convert the site into a mobile app.
Now, we do not do mobile apps so I suggested he look for someone else but warned him that it would cost him at least 5X of what it would normally cost to get the app done.
This was because there was nothing on the site that could be dynamically pulled using API and rendered on a mobile screen.
And that’s exactly what happened. The app company he went to came up with a price that was over the moon for him and told him exactly what I warned him of.
You see, like this client, I meet a lot of designers who make this exact same mistake. They learn a page builder and basic theme customization and try to build everything with that limited knowledge.
This makes the project complicated and almost impossible to manage and fix at a later stage and the only option that remains is to redo the site from scratch.
I’m not telling you this to discourage you from doing it yourself, but just warning you so that you do not lose your valuable time and money doing something you’re not 100% sure about.
So next time you have a website project think twice before building it yourself and see if you might be better off getting help.
Actionable Tip: Before starting to build the website yourself research if you can build the complete website using available themes & plugins or not. For example, you can build a full-fledged eCommerce site by simply installing Woocommerce on WordPress. But let’s say you want to put the wishlist button on the right of the product image instead of left, probably you won’t be able to do that without knowing how to code. So unless you’re 100% sure that you’ll achieve the results with your skillset and the available themes and plugins, don’t do it yourself.
3. Design For Web and Not For Print
This advice is specially for noob website designers. I usually see this being done by web designers who’re just starting out with designing UIs for the web and by designers who’re switching from traditional print designing.
Here’s the thing: you don’t design websites the same way you design a brochure, pamphlet, magazine or any other print design. There are certain standards you need to follow when designing websites and they are very different in a lot of ways from how you’d traditionally design for print.
For example, when you design a website…
- you design it for specific user experience and to achieve a particular goal (like user consuming content, getting their information or having them buying a product or service),
- you usually design in a grid pattern so that it looks good for most screens,
- you always use web-friendly fonts which are small in size so that the page load speed is fast,
- you keep different browsers and screen sizes in mind when designing for maintain responsiveness of site,
- the images and colors you use must be selected in a way that allows users to look at them for a prolonged period without straining their eyes,
- and so on…
A full-blown book can be written on this subject as there’s so much to talk about how to design websites properly. To keep this post short, I’m not getting into all of that but sharing two blog posts I found on this subject.
I highly recommend you read them:
- 17 mistakes graphic designers make when designing for web (10-minute read)
- 4 key principles of web design by Alex Bigman (7-minute read)
These two cover almost all the basics you need to know about designing websites.
Now when you design websites the right way, it makes the development process becomes super fast and super easy for the web developers that in turn helps you reduce costs dramatically.
The more fancy art you put into your designs to make it look beautiful (and not follow the standard web design guidelines), the more difficult it becomes for the developers to convert them to a website.
A lot of times they either end up not being able to build the site exactly like the designs or consume a lot of time that shoots the project cost through the roof.
So if you want your next project to be cost-effective and efficient follow this tip and you’ll be good to go with any developer you hire.
Actionable Tip: Don’t go to the next tip unless to read the articles I’ve shared above. They cover pretty much everything I could have written related to this. These articles will totally change your perspective on designing websites and will give you a lot of insights to make your next project better than the earlier ones and much more cost-effective.
4. Set a Realistic Budget
The main reason you outsource (instead of hiring someone locally) is largely to save costs. But you have to be realistic about what amount you want to pay to your outsourced website development team.
If you charge your clients around $10,000 or more for the full website design and development, you should put around 30% to 50% aside for the Design-to-WordPress conversion part with a buffer of 10% for any unexpected costs.
The exact amount depends upon whom you’re hiring and their expertise, but with this budget, you should be able to hire some of the best talents from countries like India or the Philippines.
One important thing to remember is to not go too low on your budget to increase your profitability and know exactly what to expect from the money you’re willing to pay.
This is something you can’t figure out in one go from the first project itself, but as you work with more and more developers you’ll gradually find out the perfect partner that’ll help you achieve exactly what you want in your budget.
One more important thing, do over-negotiate to bring the developer’s quote down to your budget level. The more you try to bring the price down the more resentful the developer would become and that would bring the morale of the whole team. This impacts the performance of the developer and the quality he/she delivers.
Also stay away from developers who quote some amount and then agrees to work for a lot less than quoted. Usually the best developers and development teams have standard pricing and they don’t compromise on their quote just to win the project. If you find someone who quotes a random amount but agrees at a much lower price you can easily assume that they’re more focused towards meeting their monthly sales targets and less on delivering any true quality work.
Actionable Tip: Make a thumb rule that if the developer is not ready to work in your budget and is quoting more, either increase your budget or just walk away to find someone else who might do it in your budget. Web development is a long term game and unless everything both you and the developer are comfortable from the very beginning you’ll face the consequence down the line from your developers who might not do your project with a full heart.
5. Hire for Competence and Not for Price
This brings me to the next rule which is connected to the previous one. Whenever you hire an outsourced web developer or a development team, hire them for their competence and not the ones with the lowest quote.
As the saying goes: you get what you pay for.
Web development is a very competitive niche with millions of web developers and agencies in the market that are ready to win your project at such low costs that you can’t even imagine.
Just search for “web development company” and you’ll find gazillions of search results of the companies and freelancers who provide the service. The same case is with freelancer marketplace sites like Upwork, where the developers are competing with thousands of other developers to win your job quote with their lowest bids.
Think about it – if a developer is really competent and skilled, would he/she quote least amount possible to win a job?
So be wary about hiring the developers with the lowest cost and hire the ones who would not only provide maximum value for money you pay, but also deliver the exceptional quality code.
But, how do you find excellent developers and figure out the right price to pay them?
It can be overwhelming to find one among so many of them offering who’re offering the same service.
But there’s an easy way to do this.
Have a look at the screenshot below from Upwork.com:
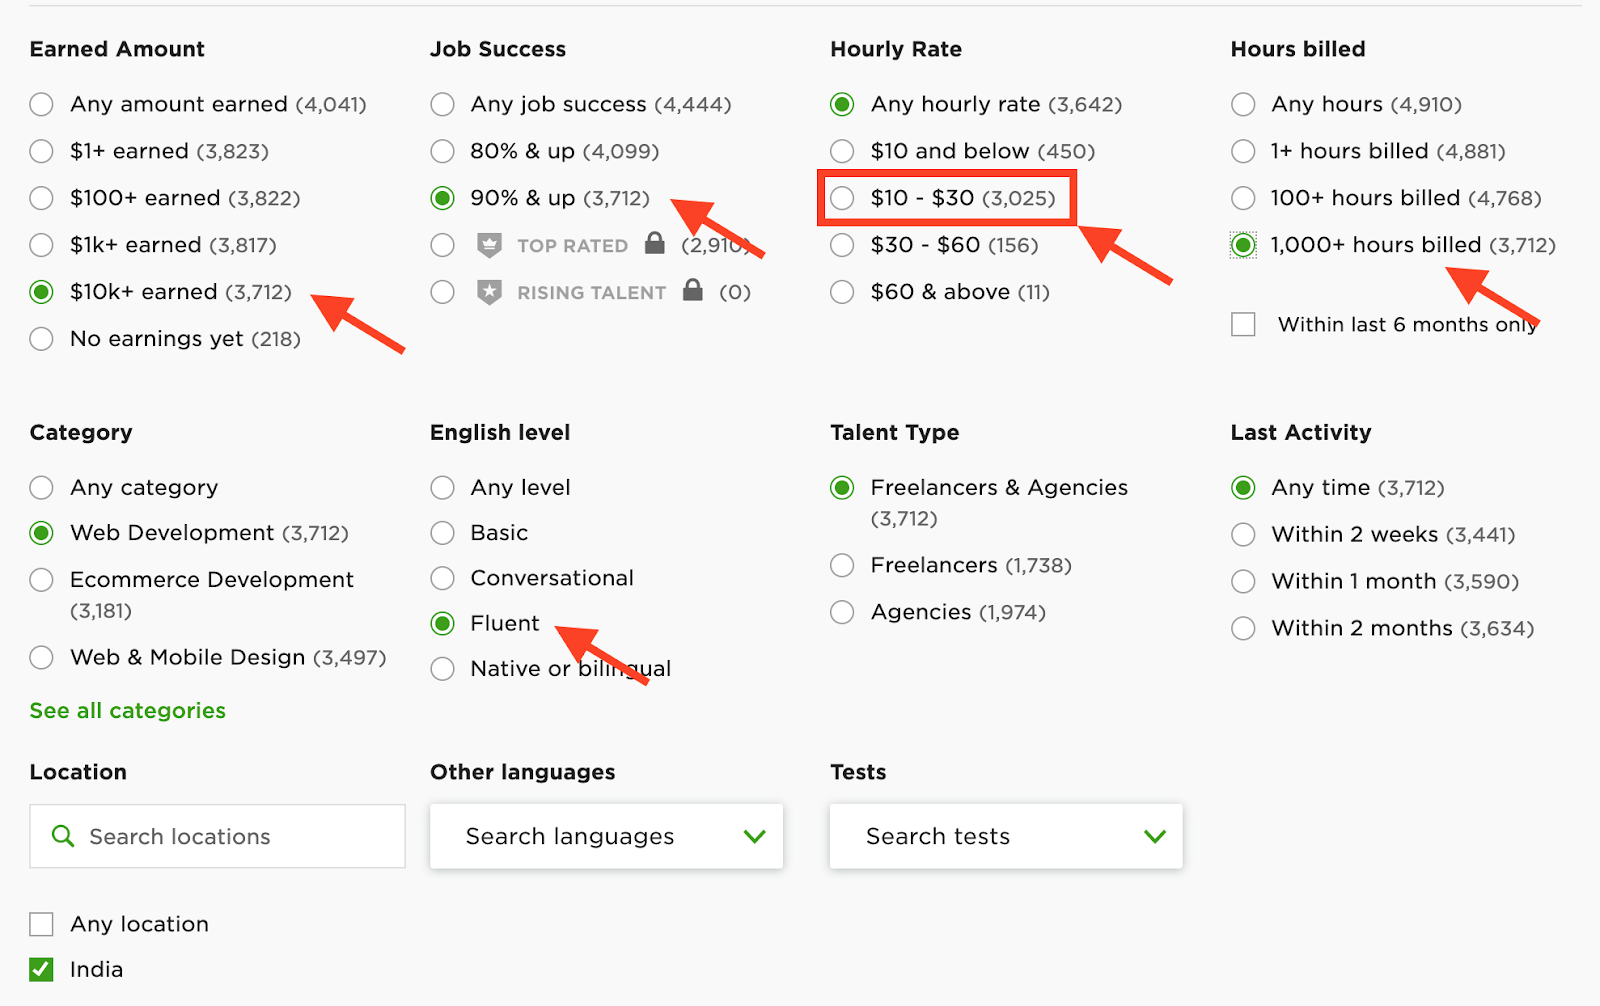
I did a quick search there for WordPress Developers to find out the Average Hourly Rate of the Best Developers in India.
I filtered web developers…
- who’ve earned minimum $10k on Upwork
- who have a minimum job success rate of 90% on Upwork
- who have been billed a minimum 1000 hours on Upwork
- who have claimed that they have Fluent English.
The developers who showed up in the search results can be easily called best web developers on the Upwork platform.
Now, notice the red outlines I’ve made. You’ll see that the hourly rate comes in the range of $10 to $30 per hour for the maximum number of these top developers.
On inspecting further you’ll find that most of them were actually in the range of $15 to $20 per hour.
So looking at this, you can assume that if you want to hire the top WordPress Developers with the highest ratings, work experience, and a proven track record, $15 to $20 an hour is what you should be ready to pay for.
At Fantastech, we charge $20/hour to our clients, which sits perfectly in that price range. Now if you compare that cost to the US average of $37.18/hours, that’s almost half of the cost that you will pay to a web developer in the US.
That means double the profit you can keep with yourself by outsourcing and still work with the best developers of the lot.
Actionable Tip: To make your life easy I am sharing the exact filter I used for the above example. If you use Upwork for finding talent, you’ll find it useful. Click on this link here to open the search page on Upwork with the filters selected. You can then go through the profiles you find and contact a few of them to know their quote and finally outsource your design conversion project to them. But if you want to save time, you can also reach out to us with your designs for a quick, free quote.
6. Prepare Clear & Detailed Instructions Document for your Developer
Know exactly what you want and put that on paper. A lot of times we get web designs from the agencies and they say go-figure. That’s a recipe for disaster. Unless you’re super clear about what you want and document it in a way that the developer can fully understand the functionalities, there’s a great chance the project may go in wrong direction.
Here are some tips that’ll help you prepare clear and detailed instructions document for your next web development project for your developer:
- Set a goal – Every project has an overall goal, so make sure this is stated upfront. If you need the developer to build a pixel-perfect site that is optimized for speed, make sure you write that specifically in the document. This way the overall goal is clear to everyone before the project starts.
- Provide as much detail as possible – Give all design-related metadata, links to design files, link to assets, website sitemap in the instructions document. I’ve prepared a simple template document for you that you can use for your next project. Make a copy of the document and edit as your own.
- Explain everything briefly – Explain each section of each page briefly in terms of what you want. In most cases, you’ll not need to put the explanation in sections that are straightforward like sections with just text and images or section with simple 3-4 columns with icons, heading, and text.
But for the more complex ones, you can explain what you want to achieve from each section and element on the page. For example, if you want a particular type of animation effect when users scroll to a section, or you want the button to change its color on hover or clicking on a particular button to open a popup or take the user to another page and so on.
These may seem like small things, but when the developer is not clear about these things the project can easily go towards a completely unintended direction. - Keep It Simple – You don’t want to waffle on things that aren’t relevant to the project. This can lead to confusion in the same way that too little information can. It’s also wise not to communicate too many things at the same time.
- Make Sure They Understand the Instructions – Let the developers go through your instructions once and then have a call with them to go through everything in detail so that everyone is on the same page. Always confirm with the developers that they understand what is expected of them and that they have everything they need for the task at hand.
Of course, there’s likely to be a few moments when instructions will be misunderstood. Even when you’re careful with your instructions, you can’t always anticipate a perfect outcome.
When miscommunications happens, view it as an opportunity to learn and reassess your instruction writing process. Update the document or have a call with the developer to get the thing sorted.
Actionable Tip: Use the template I shared above on your next design project. Make a copy of it and write all the details of the project in the same format as given in the document. Make it as detailed as possible and make sure you include all details about the project. Create a folder on Google Drive or Dropbox or whatever file storage service you use and add links to each file from this document. This will make the whole process very smooth for you and your developer.
7. Test Your Developer Before You Hire (1-Page Competency Test)
As the title suggests don’t hire a developer you’re meeting for the first time right away just by looking at their credentials, past feedback, portfolio and what they say in your first meeting.
You can use what I call as 1-Page Competency Test.
When outsourcing design to WordPress projects, you have a special edge, compared to other kinds of development projects. As all such projects start from designs, you can outsource a part of it (like 1-page) and hire a developer to test their competence before hiring for the full project.
All you do is hire the person you’ve shortlisted for a short paid test where you pay them to convert the first page of your website design (usually the homepage).
Spending a small fraction of the total project amount on this short test can be really useful to weed out the developers who might not be able to deliver the results you’re looking for. By the time they deliver the first page, you’ll have tasted the full delivery cycle working with them, the quality of code they can deliver and their communication.
When you’re 100% sure that you’ve found the right developer, you can hire them for the rest of the project or else look for another developer. This helps you to avoid making wrong hiring decisions.
I suggest this test to all our prospect clients to help them test us if they want to get a taste of what we can deliver in terms of code quality and overall project experience.
Actionable Tip: In your next web development project outsource the conversion of your first design page and test the developer in terms of quality and communication and see if you’d like to continue working with him/her. I’ve given a detailed quality assurance checklist that you’ll find in Rule #10. You can use that to test the quality of code delivered to you.
8. Be Patient And Don’t Micromanage
After the developer starts working on the project, be patient and don’t micromanage the project.
Don’t expect your developer to report to you every few hours or every day with the progress and don’t bother to give your suggestion on every little thing he/she does.
This is a common cause of conflict on projects.
From the web developers’ perspective, they think they have been hired for the skills and expertise they bring to the project. They want to feel responsible, valued and empowered.
Micro-managing them destroys trust and can lead to a lack of confidence and motivation. However hard it feels, letting go of the reins is essential to the well-being of your project.
It can be hard to let go and trust people. However, that trust is almost always repaid. All top web designers and agencies know this and that’s how they treat their developers.
Even if you know the technical side of things, don’t bother your web developer every now and then to ask how he/she is doing specific parts of the website.
But this does not mean, not to keep in touch with them at all. Before starting the project mutually agree with the developer on when they need to report to you and what you expect them to deliver each time.
Actionable Tip: On your next web development project distribute reporting from the developer over the overall project duration. You can ask your developer to keep you updated on the project once a week every Monday or Friday. Or you can ask them to report twice every week on Wednesdays and Fridays if you’re not very comfortable to wait for one whole week.
9. Be Available When Your Developer Needs You
This tip is related to the previous one. Opposite of micromanaging is disappearing completely after the project starts.
After the developer starts working, it may happen that he/she may need some information in order to move ahead with the project that got missed in the instructions document.
Now your next meeting with the developer is on Monday but you’re not available to respond to his/her query, the project might just halt till the time you’re back.
This does not just waste everyone’s time but the project delivery to your client is delayed as well.
You might not feel that this is a big issue, but I’m telling with my first-hand experience. We’ve had clients who thought they gave us all the information and went for a vacation with no way to contact them, only to know after coming back that they sent me the wrong files or did not send all the design pages.
Even if you decide to do weekly meetings as suggested above, be present at other times, just in case the developer needs to clarify some doubts.
Actionable Tip: Create a Whatsapp or Skype group or a Slack channel in which all the stakeholders are present along with the developer and project manager. This way you can have open communication with everyone involved in the project and no delay happens because of non-communication.
10. Do An All-round Quality Check
This is one of the most important tip. You outsource design to WordPress conversion projects to save cost and free up your time, but that should not come at the cost of a poorly done website.
You must make sure that what you’re receiving is top quality code that you can deliver to your client proudly.
If you’re not a developer, you might not know all the minute technical details of what to check on the delivered website, but to do that effortlessly can use my 10-Point Quality Assurance Checklist that I’ve described below.
This is a short version of the checklist we use internally to make sure the websites we deliver to our clients are perfect and QA passed.
You can use this for your next website project.
Here we go:
- Basic website check – Check the basic details like text sizes, colors, images, fonts, layout width etc of the site to make sure they’re exactly the same as documented in the instruction manual.
- Pixel-perfect test – Open the website on the browser and open the design file next to it and check each and every section on the various pages one-by-one to make sure if they look identical. If not report to your developer.
- Check the links – Click the buttons and links on all the pages to see if they’re going to the intended pages. Check if the developer is using absolute or relative links.
- Check the forms – Submit the Newsletter, Contact and all the other forms on the site and see if you’re getting an email or not and if the data is getting added to your CRM (if that integration was needed). Email setup is something web developers usually forget about while delivering.
- Check other functionalities – Check all the functionalities on the website and see if everything is working fine. If it’s an eCommerce site, do a start to end test from opening the site to adding the product to cart to checkout. Check if everything is working smoothly as expected or not.
- Cross-browser testing – Run the site on all the web browsers and devices that you have and make sure everything is working everywhere. If not report to your developer immediately.
- Page load speed testing – Notice how fast the website is loading on various connections like your broadband and on your phone’s mobile data. Use tools like Pingdom, GTMetrix and Google PageSpeed Insight tool to make sure you see a good grade and green light on all of them.
- Security testing – Test if the developer has used a strong password for the website backend. If the developer has used a Content Management System (CMS) to build the website make sure he/she has not used cracked premium theme or plugins as these might contain malware that can infect your website. Ask your developer to do a Malware scan and also install a basic firewall on-site if possible.
- Themes and Plugins testing – If a CMS is used to build the site, check the number of plugins used by the developer. Most websites do not require a ton of plugins and if you see 20+ plugins, it’s a big red flag. Ask the developer to explain the use of each and remove the ones that are not absolutely required. This will not only help in performance but also unclutter your CMS dashboard.
- Take a test drive of WordPress backend – Go through all the options in the backend and see if it’s easy to use and if you’re able to make edits and if those are getting reflected on the frontend. Understand how everything works so that you’re able to then train your client with the same.
That’s it. If you are able to get the site with all these taken care you’re good to go and show it to your clients.
Actionable Tip: When you get your website delivered the next time go through this checklist and make sure the developer has delivered on all these points.
Conclusion
So these are my 10 tips on outsourcing design to website conversion projects that’ll help you outsource your projects successfully and get the pixel perfect websites built with minimum hassle.
I hope you found this article valuable. If you want to learn more about how we can help you with your design conversion project, feel free to contact us or send us you design files for a quick, free quote.
[FREE eBook Download]
7-Point Checklist for Outsourcing Design to Code Projects Profitably & Painlessly
Outsource your design conversion projects to your development partners, the right way and get exceptional quality website code delivered on-time and within your budget WITHOUT going through the pain of inaccurate conversions, countless revisions and missed deadlines.